Drawing gradient along a path? Thermometer style gradient?
-
@Chazrox isn't that just a linear gradient split in the middle?
Free HISE Bootcamp Full Course for beginners.
YouTube Channel - HISE tutorials
My Patreon - More HISE tutorials -
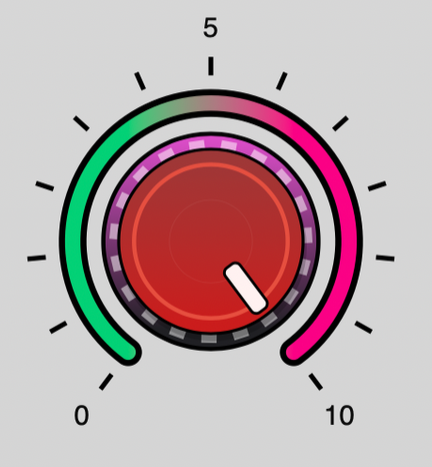
@Chazrox Like this?
-
@David-Healey Yes probably but for some reason my brain couldnt handle it. haha. I just suck at dealing with arcs and PI and radians etc let alone scripting it.
@dannytaurus Yes. What is your method? I mean I did get good results visually but is there a 'better' approach than what I have? If there is a more elegant way I would for sure prefer it.
-
@Chazrox It's the same technique as yours - many small steps, but with less visible joins.
Claude did it for me. Here's a generalised version of the code. Give it to Claude.
/* * Gradient value arc on a rotary knob (a "conic gradient" workaround) * ------------------------------------------------------------------ * HISE / JUCE has no conic (angular) gradient. `Graphics.setGradientFill` * only does linear and radial, and neither follows a circular arc: * - a radial gradient varies colour with DISTANCE from the centre, so a * constant-radius arc band comes out one flat colour; * - a linear gradient has straight colour bands, so a ~270 deg arc crosses * them at wildly varying angles and the two ends read almost identical. * * The trick below fakes a conic gradient by drawing the value arc as many * short sub-arcs and giving each one a colour based on its ANGULAR position. * Because the colour is keyed to the absolute position on the ring (not to the * current value), the gradient stays fixed and the knob simply "reveals" more * of it as the value rises. With a fine step and rounded end caps the seams * disappear and it reads as a continuous gradient. * * Paste this whole script into an empty HISE Script Interface (onInit) to try * it. To use it in a real project, keep the `drawRotarySlider` body and apply * the LookAndFeel to your own knobs. Colour blending uses the built-in * `Colours.mix(c1, c2, ratio)` (ratio 0 -> c1, 1 -> c2, alpha included). */ Content.makeFrontInterface(400, 300); // --------------------------------------------------------------------------- // Tunables // --------------------------------------------------------------------------- const var ARC_START = 0xFF005EC2; // colour at value 0 (blue) const var ARC_END = 0xFFFF0000; // colour at value 1 (red) const var ARC_SWEEP = 2.4; // half-sweep in radians (full arc = 2 * this) const var ARC_DIA = 46; // arc diameter in px const var ARC_THICK = 2; // arc stroke thickness const var ARC_STEP = 1.0 / 96.0; // gradient resolution (smaller = smoother) const var laf = Content.createLocalLookAndFeel(); const var path = Content.createPath(); const var arcStyle = { EndCapStyle: "rounded", Thickness: ARC_THICK }; laf.registerFunction("drawRotarySlider", function(g, obj) { var w = obj.area[2]; var h = obj.area[3]; var d = ARC_DIA; var box = [w / 2 - d / 2, h / 2 - d / 2, d, d]; // --- background track (full arc, dark) --- path.clear(); path.addArc(box, -1.0 * ARC_SWEEP, ARC_SWEEP); g.setColour(0xFF333333); g.drawPath(path, 0, arcStyle); // --- value arc, drawn as a segmented gradient up to the current value --- // Each sub-arc is coloured by its ABSOLUTE position `f` on the ring, so the // gradient is fixed and the knob reveals more of it. The * 1.5 overlap on // the segment end hides the seams between segments. var vn = obj.valueNormalized; var f = 0.0; var f1 = 0.0; for (f = 0.0; f < vn; f += ARC_STEP) { f1 = Math.min(f + ARC_STEP * 1.5, vn); path.clear(); path.addArc(box, -1.0 * ARC_SWEEP + f * 2.0 * ARC_SWEEP, -1.0 * ARC_SWEEP + f1 * 2.0 * ARC_SWEEP); g.setColour(Colours.mix(ARC_START, ARC_END, f)); g.drawPath(path, 0, arcStyle); } // --- value readout --- g.setColour(0xFFDDDDDD); g.setFont("Arial", 13.0); g.drawAlignedText("" + Math.round(vn * 100), obj.area, "centred"); }); // --------------------------------------------------------------------------- // Demo knob // --------------------------------------------------------------------------- const var Knob = Content.addKnob("Knob", 160, 110); Knob.set("width", 80); Knob.set("height", 80); Knob.setLocalLookAndFeel(laf); /* * Variations * ---------- * - More than two stops: replace the single `lerpColour(ARC_START, ARC_END, f)` * call with a small piecewise lookup, e.g. for blue -> green -> red: * * local c = f < 0.5 ? lerpColour(BLUE, GREEN, f * 2.0) * : lerpColour(GREEN, RED, (f - 0.5) * 2.0); * g.setColour(c); * * - "Gradient spans the swept portion" instead of being fixed to the ring: * pass `f / vn` (guard vn > 0) instead of `f`, so the arc always runs the * full start->end range regardless of value. * * - Perfectly continuous (no segments): the only way to a true conic gradient * is `Graphics.applyShader` with a fragment shader that maps angle -> colour * and discards fragments past the value angle. That removes all banding but * needs OpenGL; the segmented approach above is enough for normal knob sizes. */ -
@Chazrox I just edited the above code to be even simpler. Claude missed HISE's built-in colour interpolation method, which removed a helper function.
-
I think you're overthinking it. It's just a linear gradient, don't need to think about the arcs. Remember that the canvas is always a rectangle, you want one side green and the other pink, so that's the gradient you need.
g.setGradientFill([0xff00D275, a[0], a[3], 0xffFA0185, a[2], a[3]]);HiseSnippet 1472.3ocwX0uaaaCDmJMpC16CrNzG.t7W1sNtRJ1oIsHn4S2Ezlzf5rhMDzUvHRYyYYRAI5l3Vz+aOO6cZuA6MX6HkrkxGnMg.CyvwVG4863cG+QdmyQoxPVVlLE4T+3oILjy231epPMbmgDt.s+tv3tiDxSOlkoPaOMgjkwnHGm67b87N0VDYd82OaaRLQDxJGBgdijGxdIeLWUNZxlufGG2iPYGyGWQ6NatenTriLVNA7k635gRHgiHCXGRzpsfK5mHYCQNOv0uiO0qa2SYAqG4sJyaEORjWm.x5mtNsSW15LO5ZArPOjyc2ixUxz9JhhkAFcaIcZ+gxyD4Kva3Y7SiYZAeTeXkyGFsyPdL8nYIlLDxYwiJSS2IOMce2C3T97wKSWeuYBbIhpIMmE9btj+svkbp3RKl6R2yseXJOQUNi1e9Z28EJVZDA1ap5J45hVPcW2cjfFBU6wjQrdofvbDMV0yqEF9n4SqWG1exT3XRDdC7LHgoLHRdoLjD+RobzVBZOFKtQo5u.3N9U.Lfo1QNNQJ.gFKYlcIPayCsyXpqXJX8zVC9pcJa.OC7rdSDgJtTzXIZJ4rWKUjzo8i4TV5RsvQylbPKr7zeuY8OVulVM8Jn8qOosFWDyEr45hKUPqdr1GvDvqeMKTQDChYM.S0l.A6Idu0X2bA+pBAWTnI3uzIgLZC+NvZVXU0Pd3HAr8.VOv6o0lMtLJBhd8fs6LWYlf9pYiubgFODGfevL0efYAeOIdB6PY5XRL+CL5b37rsApXJyDifLXD+1dEfFyE3M1H+Qx4ywjoRkiX8USiYf9ebOAcGRhQ7I3kRkSDTFExxGOKLdRYD8o4FgxgCsvFEdipID7xk5BpVu1idD9MZWGSRCmAM4JjqiHpg5MtZIsIT5VogMNA3jvae3MjxKRLsJxIMMltvX.zs.i.1LQy71V6+YMl4dFiVnBruhe3Ec2GAY5kKiEPrp99WTesXkM2bkGnYz42oYHPmNHWnoYNMoyDbIsl6osptAjGJ29LRikmSO9wKwAZ1pjTUM7++JCUjiddJgxg.rGTa.Blyih771M3wcagyOvQNYE3S8381xyeMy3AEi+1lOs1MNcVk0wETdHAtMViNUpuRtw7jSK7I4QLdVjpWM+pC71lWZKN+qr1mwgUONYHwroqXmWnP90CLAAthmheFVeX7IXu1calaoHH5ec9QrxKdJe5R9Cj48a2ctWEn2+g+B7f83t5K5pWa98aRwgRE6Uh762fovWdpnnqcNMwKUFGyRu1o00vS+b.aHlL9TFD4l6nlqHTy5hEBu6MqPXX94fJJJE6K3pWkvJj6Iio5Bb5muZYSTwAIcAzBODTUYJe9cEkOyqjf3fQ9JWScIjw4q1rC5m2eWhhLyLfEgUIgkp35fwYW16gNexqJWycWV1HkLwnaQkOX09hK54kK3ut4zRgeayLMaFxYFEQi4TZL6HYFWm508qQ4YFJFBJVlzGJInA+w6+mO+u9ve7rwUaaCgf69qFXYShh3ma52BXiigSO7j8GCsggb9A2eNigorHxjXENaDXGnH5HF8XoQ+gL9fgU5ziu4YbpZX0APWsoEncIIcRr9XX0dnzcWVLgNnp13ht4DADrSq522hFq79rMVcScw64dDWEN758wEtFeD3J+W3iEsi9st6EEA2TT5fK516Wrs2yuvxC2Qo3hAGP.1AvUbObx39v0agLX0EBVLXbWmEzm1xk8zx5LPe35Uiv+.uJlzWK6TLo+rIAdYXp7cg4mQ0M7hMi.9jv7CBp4dfVFekCmH8AB96BCunotBv.aAths.6XKvt1BbUaA9XaAtls.W+1Br9LBfm0H8sFYf0HWwZjcrFYWqQtp0Her0HWyZjVygBrlCEXMGJvZNTf0bn.q4PAVygBrlCEXMGJvZNTf0bnUrlCsh0bnUtAbH8+Mpslnjiy6RAgN3n8L8t53rW9uDQ2b.5eQkOdpN
Free HISE Bootcamp Full Course for beginners.
YouTube Channel - HISE tutorials
My Patreon - More HISE tutorials -
@David-Healey Super clean. Thanks! That explanation makes sense. I am overthinking it.
-
@David-Healey Simulated angled/conical gradient looks way better to me.
With a simple linear gradient you get almost all solid colour on each side and a small transition band at the top in the middle.
Meat Beats: https://meatbeats.com
Klippr Video: https://klippr.video -
@dannytaurus said in Drawing gradient along a path? Thermometer style gradient?:
With a simple linear gradient you get almost all solid colour on each side and a small transition band at the top in the middle.
That's what the boss asked for
But you can change the angle of the linear gradient to get something more like your image. You can also add more stops to the gradient if you want.
Free HISE Bootcamp Full Course for beginners.
YouTube Channel - HISE tutorials
My Patreon - More HISE tutorials -
@David-Healey Then you hit 'full colour' way too early and mess up the end gradient. See how it starts to go back to green at the very end of the travel.
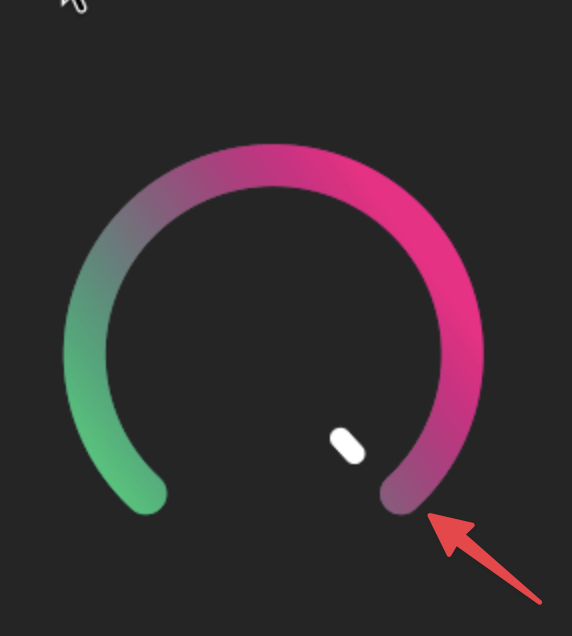
You can only truly get "thermometer style gradient" with either a real angled/conical gradient, which HISE doesn't have, or the simulated stepped version.
Linear is a poor version of that. And linear falls down completely with more than 2 colours.
Stepped can handle as many intermediary colours as you need.
-
@David-Healey @Chazrox Simplest answer is probably to add conical/angular gradients to HISE.
They're common in Photoshop and other tools. Claude will know how!

Meat Beats: https://meatbeats.com
Klippr Video: https://klippr.video -
@dannytaurus Are the blend modes broken in HISE? They dont seem to change anything.
-
@Chazrox Never used them, sorry.